
AirTags have revolutionized how we keep track of our belongings, offering a convenient and efficient solution for locating lost or misplaced items.
However, there may come a time when you need to reset AirTag, whether it’s to remove it from your account or troubleshoot connectivity issues. In such cases, knowing how to reset AirTag is essential to ensure its proper functionality.
In this Techblogwiki step-by-step guide, we’ll walk you through resetting your AirTag, providing the instructions to complete the task seamlessly.
By following these simple steps, you can easily reset your AirTag, allowing you to continue using it confidently and safely.
Whether you’re a new AirTag user or have been using them for a while, this guide will help you navigate the reset process effortlessly, ensuring that your AirTag is always ready for use whenever needed.
Why Do We Have to Reset AirTag?
Resetting an AirTag may be necessary for several reasons:
1. Transfer Ownership: If you’re giving or selling your AirTag to someone else, resetting it ensures the new owner can set it up with their Apple ID and device.
2. Remove from Account: If you no longer want to track an item with your AirTag or misplaced the AirTag itself, resetting it allows you to remove it from your Apple ID and Find My app.
3. Troubleshooting: In some cases, resetting an AirTag malfunctioning or experiencing connectivity issues can help troubleshoot and resolve the problem.
4. Prevent Unauthorized Tracking: If you’re concerned about unauthorized tracking or privacy, resetting the AirTag ensures that any previously associated tracking information is cleared.
Overall, resetting an AirTag provides a way to manage ownership, resolve technical issues, and maintain privacy and security.
How to Reset AirTag – Stepwise Guide
Resetting an AirTag is a simple process that can be done quickly with just a few steps. Whether you’re transferring ownership, troubleshooting issues, or want to remove it from your account.
Here’s a step-by-step guide to help you reset AirTag effortlessly:
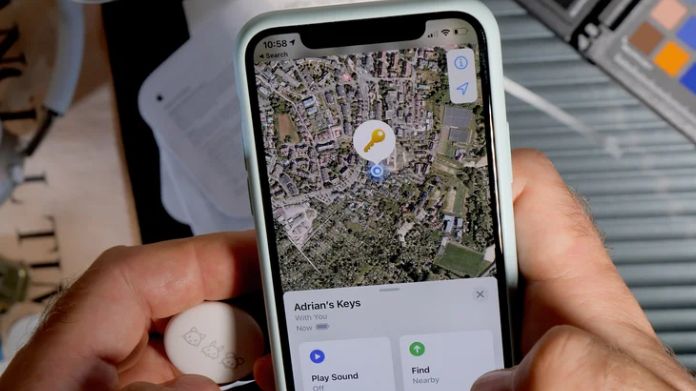
Step 1: Open Find My App
Start by opening the Find My app on your iOS devices like iPhone, iPad, or iPod. This app is your go-to hub for managing AirTags and other Apple devices.
Step 2: Select the AirTag
Navigate to the “Items” tab within the Find My app and select the AirTag you want to reset from the list of connected devices.
Step 3: Remove the AirTag
Once you’ve selected the AirTag, tap the “Remove Item” option. Confirm your selection to remove the AirTag from your account.
Step 4: Reset the AirTag
With the AirTag removed from your account, it’s time to reset it to factory settings. Press and hold down the silver button on the AirTag for about 15 seconds until you hear a sound indicating the reset process has begun.
Step 5: Complete the Reset
Hold the button until you hear a second sound, indicating the reset process is complete. Release the button, and your AirTag will be reset to its factory settings.
Step 6: Reconnect (Optional)
If you plan to use the AirTag again or transfer it to another device, you can re-add it to your account by following the initial setup process in the Find My app.
By following these simple steps, you can easily reset your AirTag and ensure it’s ready for whatever you have planned next.
Whether you’re passing it on to someone else or troubleshooting technical issues, resetting your AirTag is a quick and hassle-free process that anyone can do.
Reset AirTag by Removing It’s Battery

Resetting an AirTag by removing its battery is a straightforward process that can be done quickly with minimal effort.
Here’s a step-by-step guide to help you reset AirTag by removing its battery:
Step 1: Locate the Battery Compartment
Flip your AirTag over to its backside and locate the slight indentation near the edge. This is the battery compartment.
Step 2: Press and Twist
Press down on the indentation and twist it counterclockwise using your thumb or a small tool. This will unlock the battery compartment.
Step 3: Remove the Battery
Once the battery compartment is unlocked, gently lift it open to reveal the battery inside. Carefully remove the battery from its slot.
Step 4: Wait a Few Seconds
After removing the battery, wait for about 10-15 seconds to allow any residual power to dissipate completely.
Step 5: Reinsert the Battery (Optional)
If you continue using the AirTag, reinsert the battery into its slot. Ensure it’s properly seated and the battery compartment securely closed.
Step 6: Test the AirTag
Once the battery is reinserted (or if you choose not to reinsert it), test the AirTag to ensure it’s functioning correctly. You can do this by using the Find My app to locate the AirTag or by attaching it to an item and checking its tracking status.
Following these steps, you can reset AirTag by removing its battery. This method is helpful if you’re experiencing issues with the AirTag and need to perform a hard reset.
However, remember that removing the battery will deactivate the AirTag’s tracking capabilities until the battery is reinserted or replaced.
Final Note
Resetting your AirTag is a simple process that can be done quickly and easily using the steps outlined in this guide.
Whether you’re transferring ownership, troubleshooting technical issues, or needing to remove the AirTag from your account, following these step-by-step instructions will ensure that your AirTag is easily reset to its factory settings.
By familiarizing yourself with the reset process, you can maintain optimal functionality and privacy while using your AirTag.
Always take precautions when handling the AirTag, especially when removing its battery, and ensure you follow the recommended steps to avoid damage.
With this guide, you can confidently reset AirTag whenever necessary, ensuring that it continues to serve its purpose effectively in helping you keep track of your belongings.